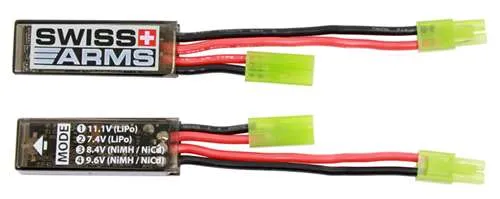
Features:Progammable 2-12 Shots and Burst Fire7.4 and 11.1 lipo8.4 and 9.6 Nimh/NicadThere are 4 types of MODES selection available to configure on your Mosfet depending on the Voltage of your battery.Choose the MODE depending on the voltage of your battery.How to configure different MODES on your Mosfet is as below:MODE 1 selection (11.1v):Step 1 - Long press the button on the Mosfet for 5 seconds till the LED lights up and then release the button. The light will remain lit up for 5 seconds.Step 2 - You must Short press 1 time (while the LED is still on) and the light will blink 1 time signaling now it is on MODE 1.Step 3 - To finish your selection of MODE 1, you need to Long press the button for 5 seconds, till the light go off on the Mosfet, signaling the MODE 1 selection is complete.Note: If you forget which MODE you configured or you want to double confirm you are in the right MODE, simply short press the button to see how many times the LED light blinks on your Mosfet, after the Step 3 has been completed.MODE 2 selection (7.4v):Step 1 - Long press the button on the Mosfet for 5 seconds till the LED lights up and then release the button. The light will remain lit up for 5 seconds..Step 2 - You must Short press 1 time (while the LED is still on) and the light will blink 1 time.Step 3 - Short press 1 more time and the light will blink 2 times signaling now it is on MODE 2.Step 4 - To finish your selection of MODE 2, you need to Long press the button for 5 seconds, till the light go off on the Mosfet, signaling the MODE 2 selection is complete.Note: If you forget which MODE you configured or you want to double confirm you are in the right MODE, simply short press the button to see how many times the LED light blinks on your Mosfet, after the Step 3 has been completed.MODE 3 selection (8.4v):Step 1 - Long press the button on the Mosfet for 5 seconds till the LED lights up and then release the button. The light will remain lit up for 5 seconds.Step 2 - You must Short press 1 time (while the LED is still on) and the light will blink 1 time.Step 3 - Short press 1 more time and the light will blink 2 times.Step 4 - Short press 1 more time and the light will blink 3 times signaling now it is on MODE 3.Step 5 - To finish your selection of MODE 3, you need to Long press the button for 5 seconds, till the light go off on the Mosfet, signaling the MODE 3 selection is complete.Note: If you forget which MODE you configured or you want to double confirm you are in the right MODE, simply short press the button to see how many times the LED light blinks on your Mosfet, after the Step 3 has been completed.MODE 4 selection (9.6v):Step 1 - Long press the button on the Mosfet for 5 seconds till the LED lights up and then release the button. The light will remain lit up for 5 seconds.Step 2 - You must Short press 1 time (while the LED is still on) and the light will blink 1 time.Step 3 - Short press 1 more time and the light will blink 2 times.Step 4 - Short press 1 more time and the light will blink 3 times.Step 5 - Short press 1 more time and the light will blink 4 times, signaling now it is on MODE 4.Step 5 - To finish your selection of MODE 4, you need to Long press the button for 5 seconds, till the light go off on the Mosfet, signaling the MODE 4 selection is complete.Note ** If by mistake you short press the button 1 more time after step 5 above, the light will blink 1 time signaling it has gone back step 2, so you need to repeat the step 3, 4, 5 again to arrive at MODE 4 selection.Note: If you forget which MODE you configured or you want to double confirm you are in the right MODE, simply short press the button to see how many times the LED light blinks on your Mosfet, after the Step 3 has been completed.The MODE selection will remain on same MODE configured, even if you disconnect the battery from your Mosfet.Caution:Please select the correct MODE to prolong the life of your battery.Some things to note:If you disconnect the Mosfet from your battery, it will still remember the shooting configuration of upto less than 15 shots.Over 15 shots, it will default to 1 shot.After selection of the mode then you can program your mosfet.After connection of mosfet, Pull the trigger and keep it held down.After 5 seconds you will hear a beep, beep, beep sound.Pull the trigger according to how many shots you want 1.So if you want a 5 shot burst pull the trigger 6 times and keep it pressed on the sixth shot.You will then hear a beep, beep, beep sound.Your mosfet is now programmed.Hi voltage lipo batteries may offset your program by 1-2 shots as the motor is running very fast.

")


")